When you use audio transcription services, you don’t always need the whole recording transcribed — sometimes you only need a specific portion. Paying for an entire two-hour file makes little sense if the part you actually need lasts twenty minutes. To solve this, Scribie offers a built-in Trim Audio feature. It lets you select and transcribe only the sections you need from any file you submit for audio transcription services.
In this post, we’ll explain how the Trim Audio feature works on Scribie’s new platform. Then we’ll walk you through the process step by step. This article updates our previous posts, Trim File Feature (2013) and Scribie’s Trim Audio Feature (2023). It reflects the latest enhancements we introduced with Scribie’s new platform, which launched in March 2025.
How Trimming Audio Before Transcription Works
Trimming creates a new, shorter file that contains only the time range you choose. Your original upload stays untouched, so you can return to it later and create additional clips if you need them. In practice, this means you control exactly what enters the transcript before you ever place an order.
The benefit is straightforward. You only pay for the minutes you submit, and you only review the content that matters. As a result, the whole workflow moves faster — both for you and for the transcribers who handle your file.
It’s worth noting what trimming is not. The feature doesn’t edit or alter your original recording in any way. Instead, it copies the chosen segment into a separate file and leaves the source exactly as you uploaded it. Consequently, you never risk losing the full recording, and you can always go back to trim a different section later.
How to Trim Audio in 3 Easy Steps
If you’d like to order only a portion of an audio or video file, Scribie makes the process quick and easy. In just three simple steps, you can create a new file that contains only the portion you want transcribed.
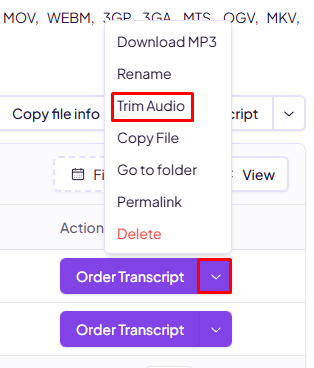
1. Select “Trim Audio” from the File Menu
First, upload the audio or video file you would like transcribed. Once the upload finishes, the file appears on the Upload page.
Next, click the drop-down menu on the right side of the file and select Trim Audio.
2. Enter the Start and End Timestamps
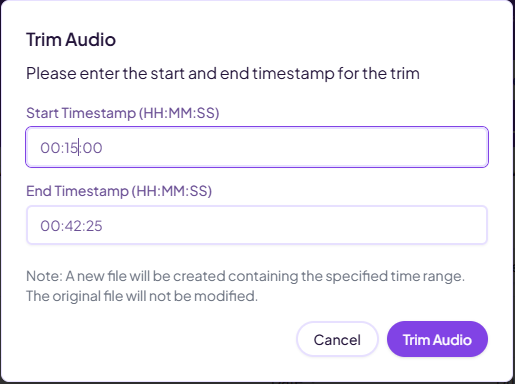
In the Trim Audio dialog box, enter the start and end timestamps for the section you want to transcribe. The platform displays timestamps in HH:MM:SS format, so you can pinpoint the exact range down to the second.
Once you’ve entered the timestamps you want, click Trim Audio.
3. Order the Trimmed File
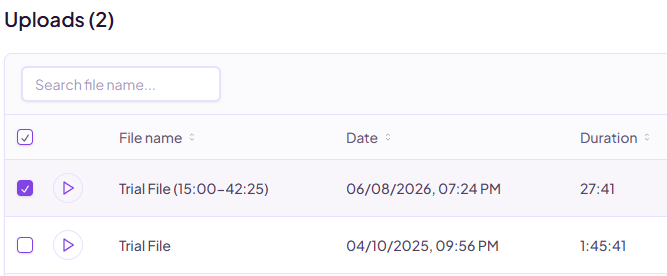
After the trim finishes, Scribie creates a new file that contains only the selected portion of the recording. Meanwhile, the original file stays available on the Upload page, so you can create more trimmed versions whenever you need them.
To proceed, simply place an order for the newly created trimmed file. The file name includes the start and end timestamps you selected, which makes the clip easy to identify at a glance.
Can Scribie Trim the Audio File for You?
Yes. If you’d prefer not to trim the audio yourself, we’re happy to do it for you.
Simply send us a message through our Contact Us page and include two things: the link to your uploaded file, and the start and end timestamps you want. Our support team will then create the trimmed file and have it ready for your order. Therefore, even if you’re short on time or working with a tricky recording, you still get a clip tailored to your needs. This option is especially handy when timestamps are hard to pinpoint, or when you’re juggling several files at once and would rather hand the task to us.
Why Trim Audio Before Audio Transcription?
Using the Trim Audio feature before you order audio transcription gives you far greater control over what gets transcribed. Some of the main benefits include:
- Pay only for the audio you need transcribed. Instead of submitting a full recording, you submit the relevant minutes and keep your costs in line with your actual need.
- Exclude irrelevant sections. Breaks, silence, small talk, and off-topic discussion add length without adding value, so trimming removes them up front.
- Speed up the turnaround. A shorter file moves through the workflow faster, which means you receive your finished transcript sooner.
- Create multiple clips from one recording. You can split a single file into separate orders — for example, one clip per speaker, topic, or agenda item.
Whether you need a short interview segment, a specific meeting discussion, or just a portion of a lecture, this feature helps you save both time and money. Furthermore, it keeps the focus on the content that matters most to you.
Leave a Reply